우선 CentOS7 minimal 설치후 Apache로 진행된 자료 입니다.
작업시 #은 복사하지말고 복사&붙혀넣기 신공으로 따라해 보세요.....^^
코드 붙혀넣는 작업이 더 힘드네요...아고고~
[code]
# yum -y update
# yum -y install nano wget
[/code]
@ hosts 편집
[code]
# nano /etc/hosts
[/code]
자신의 서버IP (예 : 192.168.0.100) server1.mydomain.com server1 추가
[code]
# echo 'server1.nanoomihost.com' > /etc/hostname
[/code]
@ 방화벽 구성 및 기본 네트워크 소프트웨어 설치
[code]
# systemctl stop firewalld.service
# systemctl disable firewalld.service
# firewall-cmd --state
[/code]
not running
[code]
# yum -y install net-tools NetworkManager-tui
[/code]
@ SELinux 비활성화
[code]
# nano /etc/selinux/config
[/code]
SELINUX=disabled 로 수정
[code]
# reboot
[/code]
@ epel 추가 저장소 설치
[code]
# wget //dl.fedoraproject.org/pub/epel/7/x86_64/e/epel-release-7-9.noarch.rpm
# wget //rpms.remirepo.net/enterprise/remi-release-7.rpm
# rpm -Uvh remi-release-7.rpm epel-release-7-9.noarch.rpm
# yum -y install yum-priorities
# nano /etc/yum.repos.d/epel.repo
[/code]
[epel]
name=Extra Packages for Enterprise Linux 7 - $basearch
#baseurl=//download.fedoraproject.org/pub/epel/7/$basearch
mirrorlist=https://mirrors.fedoraproject.org/metalink?repo=epel-7&arch=$basearch
failovermethod=priority
enabled=1
priority=10 => 추가 후 저장
gpgcheck=1
gpgkey=file:///etc/pki/rpm-gpg/RPM-GPG-KEY-EPEL-7
[...]
[code]
# yum update
# yum -y groupinstall 'Development Tools'
[/code]
@쿼터 설정
[code]
# yum -y install quota
# mount | grep ' / '
[/code]
/dev/mapper/cl-root on / type xfs (rw,relatime,attr2,inode64,noquota)
[code]
# mount | grep ' /var '
[/code]
이부분은 파티션을 처음 설정할때 /var 부분을 별도로 정했을때 확인한다. 그렇지 않고 자동으로 파티션을 잡았다면 통과!
[code]
# nano /etc/default/grub
[/code]
GRUB_CMDLINE_LINUX="crashkernel=auto rd.lvm.lv=cl/root rd.lvm.lv=cl/swap rhgb quiet" 부분을 아래와 같이 변경후 저장
GRUB_CMDLINE_LINUX="crashkernel=auto rd.lvm.lv=cl/root rd.lvm.lv=cl/swap rhgb quiet rootflags=uquota,gquota"
[code]
# cp /boot/grub2/grub.cfg /boot/grub2/grub.cfg_bak
# grub2-mkconfig -o /boot/grub2/grub.cfg
[/code]
Generating grub configuration file ...
Found linux image: /boot/vmlinuz-3.10.0-514.10.2.el7.x86_64
Found initrd image: /boot/initramfs-3.10.0-514.10.2.el7.x86_64.img
Found linux image: /boot/vmlinuz-3.10.0-514.el7.x86_64
Found initrd image: /boot/initramfs-3.10.0-514.el7.x86_64.img
Found linux image: /boot/vmlinuz-0-rescue-8f8469cfc2534ec9ad9aa321579f7de8
Found initrd image: /boot/initramfs-0-rescue-8f8469cfc2534ec9ad9aa321579f7de8.img
done
[code]
# reboot
# mount | grep ' / '
[/code]
/dev/mapper/cl-root on / type xfs (rw,relatime,attr2,inode64,usrquota,grpquota)
할당량이 활성화되면 마운트 옵션 목록에서 " usrquota, grpquota "를 볼 수 있습니다.
@ 서버 파티션중 /var을 잡았다면 아래와 같이 수정해 준다.
[code]
# nano /etc/fstab
[/code]
/dev/mapper/centos-var /var xfs defaults 1 2 부분을 아래와 같이 추가후 저장해 준다
/dev/mapper/centos-var /var xfs defaults,uquota,gquota 1 2
해당 부분이 없다면 그냥 통과 하면 된다....^^
[code]
# mount -o remount /var
[/code]
mount: can't find /var in /etc/fstab => /var 파티션이 없다면 이렇게 출력된다.
@ 할당량을 사용하도록 설정합니다.
[code]
# quotacheck -avugm
[/code]
quotacheck: Skipping /dev/mapper/cl-root [/]
quotacheck: Cannot find filesystem to check or filesystem not mounted with quota option.
[code]
# quotaon -avug
[/code]
@ Apache, MySQL, phpMyAdmin 설치
[code]
# yum -y install ntp httpd mod_ssl mariadb-server php php-mysql php-mbstring phpmyadmin
# echo "RequestHeader unset Proxy early" >> /etc/httpd/conf/httpd.conf
# service httpd restart
[/code]
@ Dovecot 설치
[code]
# yum -y install dovecot dovecot-pigeonhole dovecot-mysql
# touch /etc/dovecot/dovecot-sql.conf
# ln -s /etc/dovecot/dovecot-sql.conf /etc/dovecot-sql.conf
# systemctl enable dovecot.service
# systemctl start dovecot.service
[/code]
@ Postfix 설치
[code]
# yum -y install postfix
# systemctl stop sendmail.service
[/code]
Failed to stop sendmail.service: Unit sendmail.service not loaded.
[code]
# systemctl disable sendmail.service
[/code]
Failed to execute operation: No such file or directory
[code]
# systemctl enable postfix.service
# systemctl restart postfix.service
[/code]
@ Getmail 설치
[code]
# yum -y install getmail
[/code]
@ MariaDB 패스워드 셋팅 및 phpMyAdmin 구성
[code]
# yum -y install mariadb mariadb-server
# systemctl enable mariadb.service
# systemctl start mariadb.service
# mysql_secure_installation
[/code]
Enter current password for root (enter for none):
OK, successfully used password, moving on...
Setting the root password ensures that nobody can log into the MariaDB
root user without the proper authorisation.
Set root password? [Y/n] y
New password:
Re-enter new password:
Password updated successfully!
Reloading privilege tables..
... Success!
By default, a MariaDB installation has an anonymous user, allowing anyone
to log into MariaDB without having to have a user account created for
them. This is intended only for testing, and to make the installation
go a bit smoother. You should remove them before moving into a
production environment.
Remove anonymous users? [Y/n] y
... Success!
Normally, root should only be allowed to connect from 'localhost'. This
ensures that someone cannot guess at the root password from the network.
Disallow root login remotely? [Y/n] y
... Success!
By default, MariaDB comes with a database named 'test' that anyone can
access. This is also intended only for testing, and should be removed
before moving into a production environment.
Remove test database and access to it? [Y/n] y
- Dropping test database...
... Success!
- Removing privileges on test database...
... Success!
Reloading the privilege tables will ensure that all changes made so far
will take effect immediately.
Reload privilege tables now? [Y/n] y
... Success!
Cleaning up...
All done! If you've completed all of the above steps, your MariaDB
installation should now be secure.
Thanks for using MariaDB!
[code]
# nano /etc/httpd/conf.d/phpMyAdmin.conf
[/code]
아래와 같이 Require ip 두곳에 # 주석처리후 바로아래에 Require all granted 를 추가하고 저장한다.
# phpMyAdmin - Web based MySQL browser written in php
#
# Allows only localhost by default
#
# But allowing phpMyAdmin to anyone other than localhost should be considered
# dangerous unless properly secured by SSL
Alias /phpMyAdmin /usr/share/phpMyAdmin
Alias /phpmyadmin /usr/share/phpMyAdmin
<Directory /usr/share/phpMyAdmin/>
<IfModule mod_authz_core.c>
# Apache 2.4
<RequireAny>
# Require ip 127.0.0.1
# Require ip ::1
Require all granted
</RequireAny>
</IfModule>
<IfModule !mod_authz_core.c>
# Apache 2.2
Order Deny,Allow
Deny from All
Allow from 127.0.0.1
Allow from ::1
</IfModule>
</Directory>
[code]
# nano /etc/phpMyAdmin/config.inc.php
[/code]
$cfg['Servers'][$i]['auth_type'] = 'cookie'; cookie를 아래와 같이 http로 수정하고 저장한다.
$cfg['Servers'][$i]['auth_type'] = 'http';
[code]
# systemctl enable httpd.service
# systemctl restart httpd.service
[/code]
@ Amavisd-new, SpamAssassin, And ClamAV 설치
[code]
# yum -y install amavisd-new spamassassin clamav-server clamav-data clamav-update clamav-filesystem clamav clamav-scanner-systemd clamav-devel clamav-lib clamav-server-systemd unzip bzip2 perl-DBD-mysql postgrey
# nano /etc/freshclam.conf
[/code]
Example 부분을 아래와 같이 주석처리 하고 저장
# Example
[code]
# nano /etc/sysconfig/freshclam
[/code]
마지막줄에 해당 구문을 아래와 같이 주석 처리 해 준다.
# FRESHCLAM_DELAY=disabled-warn # REMOVE ME
@freshclam, amavisd 및 clamd.amavisd 업데이트 및 시작
[code]
# sa-update
# freshclam
# systemctl enable amavisd.service
# systemctl start amavisd.service
# systemctl enable clamd@amavisd.service
# systemctl start clamd@amavisd.service
# systemctl enable postgrey.service
# systemctl start postgrey.service
[/code]
@ Apache with mod_php, mod_fcgi/PHP5, PHP-FPM 설치
[code]
# yum -y install php php-devel php-gd php-imap php-ldap php-mysql php-odbc php-pear php-xml php-xmlrpc php-pecl-apc php-mbstring php-mcrypt php-mssql php-snmp php-soap php-tidy curl curl-devel perl-libwww-perl ImageMagick libxml2 libxml2-devel mod_fcgid php-cli httpd-devel php-fpm php-pecl-ssh2
# nano /etc/php.ini
[/code]
error_reporting = E_ALL & ~ E_DEPRECATED & ~ E_STRICT 를 찾아서 주석 처리후 아래와 같이 변경 한다.
;error_reporting = E_ALL & ~ E_DEPRECATED & ~ E_STRICT
error_reporting = E_ALL & ~E_NOTICE & ~E_DEPRECATED & ~E_STRICT
;cgi.fix_pathinfo=1 를 찾아서 아래와 같이 주석을 삭제 한다.
cgi.fix_pathinfo=1
;date.timezone = 를 찾아서 아래와 같이 변경후 저장 한다.
date.timezone = "America/Denver" 한국이라면 date.timezone = "Korea/Seoul" 로 변경하면 되겠죠...^^
[code]
# systemctl start php-fpm.service
# systemctl enable php-fpm.service
# systemctl enable httpd.service
# systemctl restart httpd.service
[/code]
@ Let's encrypt SSL 추가 설치
[code]
# mkdir /opt/certbot
# cd /opt/certbot
# wget https://dl.eff.org/certbot-auto
# chmod a+x ./certbot-auto
# ./certbot-auto
[/code]
no names were found in your configuration files 메세지가 나오면서 계속 할것이냐고 물으면 "c" 를 클릭하고 엔터키를 눌러 취소 한다.
@ mod_python 설치
[code]
# yum -y install python-devel
# cd /usr/local/src/
# wget //dist.modpython.org/dist/mod_python-3.5.0.tgz
# tar xfz mod_python-3.5.0.tgz
# cd mod_python-3.5.0
# ./configure
# make && make install
[/code]
만약 설치중 컴파일 오유가 나타난다면 아래 sed 멸령을 실행 후에 재설치 하시기 바랍니다. 정상적으로 설치가 되면 아래 sed 명령은 패쓰~~~
[code]
sed -e 's/(git describe --always)/(git describe --always 2>\/dev\/null)/g' -e 's/`git describe --always`/`git describe --always 2>\/dev\/null`/g' -i $( find . -type f -name Makefile\* -o -name version.sh )
[/code]
설치가 끝나면 아래와 같이 Apache 모듈 활성화를 해 줍니다.
[code]
# echo 'LoadModule python_module modules/mod_python.so' > /etc/httpd/conf.modules.d/10-python.conf
# systemctl restart httpd.service
[/code]
@ PureFTPd 설치
[code]
# yum -y install pure-ftpd
# systemctl enable pure-ftpd.service
# systemctl start pure-ftpd.service
# yum -y install openssl
# nano /etc/pure-ftpd/pure-ftpd.conf
[/code]
아래와 같이 주석 처리 된것을 해제 한다음 저장
# TLS 1
TLS 1
[code]
# mkdir -p /etc/ssl/private/
# openssl req -x509 -nodes -days 7300 -newkey rsa:2048 -keyout /etc/ssl/private/pure-ftpd.pem -out /etc/ssl/private/pure-ftpd.pem
[/code]
Country Name (2 letter code) [XX]: <-- Enter your Country Name (e.g., "US").
State or Province Name (full name) []: <-- Enter your State or Province Name.
Locality Name (eg, city) [Default City]: <-- Enter your City.
Organization Name (eg, company) [Default Company Ltd]: <-- Enter your Organization Name (e.g., the name of your company).
Organizational Unit Name (eg, section) []: <-- Enter your Organizational Unit Name (e.g. "IT Department").
Common Name (eg, your name or your server's hostname) []: <-- Enter the Fully Qualified Domain Name of the system (e.g. "server1.example.com").
Email Address []: <-- Enter your Email Address.
[code]
# chmod 600 /etc/ssl/private/pure-ftpd.pem
# systemctl restart pure-ftpd.service
[/code]
@ BIND 설치
[code]
# yum -y install bind bind-utils haveged
# cp /etc/named.conf /etc/named.conf_bak
# cat /dev/null > /etc/named.conf
# nano /etc/named.conf
[/code]
아래 내용을 추가후 저장 한다.
//
// named.conf
//
// Provided by Red Hat bind package to configure the ISC BIND named(8) DNS
// server as a caching only nameserver (as a localhost DNS resolver only).
//
// See /usr/share/doc/bind*/sample/ for example named configuration files.
//
options {
listen-on port 53 { any; };
listen-on-v6 port 53 { any; };
directory "/var/named";
dump-file "/var/named/data/cache_dump.db";
statistics-file "/var/named/data/named_stats.txt";
memstatistics-file "/var/named/data/named_mem_stats.txt";
allow-query { any; };
recursion no;
};
logging {
channel default_debug {
file "data/named.run";
severity dynamic;
};
};
zone "." IN {
type hint;
file "named.ca";
};
include "/etc/named.conf.local";
[code]
# touch /etc/named.conf.local
# systemctl enable named.service
# systemctl start named.service
# systemctl enable haveged.service
# systemctl start haveged.service
[/code]
@ Webalizer And AWStats 설치
[code]
# yum -y install webalizer awstats perl-DateTime-Format-HTTP perl-DateTime-Format-Builder
# nano /etc/httpd/conf.d/awstats.conf
[/code]
Require local 부분을 찾아서 Require all granted 바꾸고 저장 한다.
[code]
systemctl restart httpd.service
[/code]
@ Jailkit 설치
중요 : Jailkit은 ISPConfig 전에 설치해야합니다 - 나중에 설치할 수 없습니다.
[code]
# cd /tmp
# wget //olivier.sessink.nl/jailkit/jailkit-2.19.tar.gz
# tar xvfz jailkit-2.19.tar.gz
# cd jailkit-2.19
# ./configure
# make && make install
# cd ..
# rm -rf jailkit-2.19*
[/code]
@ rkhunter 설치
[code]
# yum -y install rkhunter
[/code]
@ Mailman 설치
[code]
# yum -y install mailman
# touch /var/lib/mailman/data/aliases
# touch /etc/mailman/aliases
# /usr/lib/mailman/bin/newlist mailman
[/code]
Enter the email of the person running the list: <-- admin email address, e.g. webmaster@example.com
Initial mailman password: <-- admin password for the mailman list
To finish creating your mailing list, you must edit your /etc/aliases (or
equivalent) file by adding the following lines, and possibly running the
`newaliases' program:
## mailman mailing list
mailman: "|/usr/lib/mailman/mail/mailman post mailman"
mailman-admin: "|/usr/lib/mailman/mail/mailman admin mailman"
mailman-bounces: "|/usr/lib/mailman/mail/mailman bounces mailman"
mailman-confirm: "|/usr/lib/mailman/mail/mailman confirm mailman"
mailman-join: "|/usr/lib/mailman/mail/mailman join mailman"
mailman-leave: "|/usr/lib/mailman/mail/mailman leave mailman"
mailman-owner: "|/usr/lib/mailman/mail/mailman owner mailman"
mailman-request: "|/usr/lib/mailman/mail/mailman request mailman"
mailman-subscribe: "|/usr/lib/mailman/mail/mailman subscribe mailman"
mailman-unsubscribe: "|/usr/lib/mailman/mail/mailman unsubscribe mailman"
Hit enter to notify mailman owner... <-- ENTER
[code]
# ln -s /usr/lib/mailman/mail/mailman /usr/bin/mailman
# nano /etc/aliases
[/code]
아래 내용을 추가 해주고 저장 한다.
[...]
mailman: "|/usr/lib/mailman/mail/mailman post mailman"
mailman-admin: "|/usr/lib/mailman/mail/mailman admin mailman"
mailman-bounces: "|/usr/lib/mailman/mail/mailman bounces mailman"
mailman-confirm: "|/usr/lib/mailman/mail/mailman confirm mailman"
mailman-join: "|/usr/lib/mailman/mail/mailman join mailman"
mailman-leave: "|/usr/lib/mailman/mail/mailman leave mailman"
mailman-owner: "|/usr/lib/mailman/mail/mailman owner mailman"
mailman-request: "|/usr/lib/mailman/mail/mailman request mailman"
mailman-subscribe: "|/usr/lib/mailman/mail/mailman subscribe mailman"
mailman-unsubscribe: "|/usr/lib/mailman/mail/mailman unsubscribe mailman"
[code]
# newaliases
# systemctl restart postfix.service
# nano /etc/httpd/conf.d/mailman.conf
[/code]
아래 구문과 같이 ScriptAlias /cgi-bin/mailman/ /usr/lib/mailman/cgi-bin/ 를 추가 해주시고
#Alias /pipermail/ /var/lib/mailman/archives/public/ 를 # 주석 처리 하신후
Alias /pipermail /var/lib/mailman/archives/public/ 추가 해 주세요.
#
# httpd configuration settings for use with mailman.
#
ScriptAlias /mailman/ /usr/lib/mailman/cgi-bin/
ScriptAlias /cgi-bin/mailman/ /usr/lib/mailman/cgi-bin/
<Directory /usr/lib/mailman/cgi-bin/>
AllowOverride None
Options ExecCGI
Require all granted
</Directory>
#Alias /pipermail/ /var/lib/mailman/archives/public/
Alias /pipermail /var/lib/mailman/archives/public/
<Directory /var/lib/mailman/archives/public>
Options MultiViews FollowSymLinks
AllowOverride None
Require all granted
AddDefaultCharset Off
</Directory>
# Uncomment the following line, replacing www.example.com with your server's
# name, to redirect queries to /mailman to the listinfo page (recommended).
# RedirectMatch ^/mailman[/]*$ //www.example.com/mailman/listinfo
[code]
# systemctl restart httpd.service
# systemctl enable mailman.service
# systemctl start mailman.service
[/code]
@ Roundcube webmail 설치
[code]
# yum -y install roundcubemail
# nano /etc/httpd/conf.d/roundcubemail.conf
[/code]
아래와 같이 roundcubemail.conf 구성 파일을 수정하세요.
#
# Round Cube Webmail is a browser-based multilingual IMAP client
#
Alias /roundcubemail /usr/share/roundcubemail
Alias /webmail /usr/share/roundcubemail
# Define who can access the Webmail
# You can enlarge permissions once configured
#<Directory /usr/share/roundcubemail/>
# <IfModule mod_authz_core.c>
# # Apache 2.4
# Require local
# </IfModule>
# <IfModule !mod_authz_core.c>
# # Apache 2.2
# Order Deny,Allow
# Deny from all
# Allow from 127.0.0.1
# Allow from ::1
# </IfModule>
#</Directory>
<Directory /usr/share/roundcubemail/>
Options none
AllowOverride Limit
Require all granted
</Directory>
# Define who can access the installer
# keep this secured once configured
#<Directory /usr/share/roundcubemail/installer/>
# <IfModule mod_authz_core.c>
# # Apache 2.4
# Require local
# </IfModule>
# <IfModule !mod_authz_core.c>
# # Apache 2.2
# Order Deny,Allow
# Deny from all
# Allow from 127.0.0.1
# Allow from ::1
# </IfModule>
#</Directory>
<Directory /usr/share/roundcubemail/installer>
Options none
AllowOverride Limit
Require all granted
</Directory>
# Those directories should not be viewed by Web clients.
<Directory /usr/share/roundcubemail/bin/>
Order Allow,Deny
Deny from all
</Directory>
<Directory /usr/share/roundcubemail/plugins/enigma/home/>
Order Allow,Deny
Deny from all
</Directory>
[code]
# systemctl restart httpd.service
# mysql -u root -p
[/code]
아래와 같이 데이터베이스를 설치 해 줍니다.
Enter password:
Welcome to the MariaDB monitor. Commands end with ; or \g.
Your MariaDB connection id is 14
Server version: 5.5.52-MariaDB MariaDB Server
Copyright (c) 2000, 2016, Oracle, MariaDB Corporation Ab and others.
Type 'help;' or '\h' for help. Type '\c' to clear the current input statement.
MariaDB [(none)]> CREATE DATABASE roundcubedb;
Query OK, 1 row affected (0.00 sec)
MariaDB [(none)]> CREATE USER roundcubeuser@localhost IDENTIFIED BY 'roundcubepassword';
Query OK, 0 rows affected (0.00 sec)
MariaDB [(none)]> GRANT ALL PRIVILEGES on roundcubedb.* to roundcubeuser@localhost ;
Query OK, 0 rows affected (0.00 sec)
MariaDB [(none)]> FLUSH PRIVILEGES;
Query OK, 0 rows affected (0.00 sec)
MariaDB [(none)]> exit
Bye
DB작업 완료후 브라우저로 아래 링크로 접근해서 설치를 진행 합니다.
//자신의IP/roundcubemail/installer
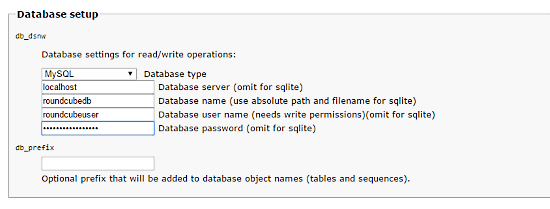
그런다음에
[code]
# nano /etc/roundcubemail/config.inc.php
[/code]
아래 내용으로 수정 한후 저장 한다.
<?php
/* Local configuration for Roundcube Webmail */
// ----------------------------------
// SQL DATABASE
// ----------------------------------
// Database connection string (DSN) for read+write operations
// Format (compatible with PEAR MDB2): db_provider://user:password@host/database
// Currently supported db_providers: mysql, pgsql, sqlite, mssql or sqlsrv
// For examples see //pear.php.net/manual/en/package.database.mdb2.intro-dsn.php
// NOTE: for SQLite use absolute path: 'sqlite:////full/path/to/sqlite.db?mode=0646'
$config['db_dsnw'] = 'mysql://roundcubeuser:roundcubepassword@localhost/roundcubedb';
// ----------------------------------
// IMAP
// ----------------------------------
// The mail host chosen to perform the log-in.
// Leave blank to show a textbox at login, give a list of hosts
// to display a pulldown menu or set one host as string.
// To use SSL/TLS connection, enter hostname with prefix ssl:// or tls://
// Supported replacement variables:
// %n - hostname ($_SERVER['SERVER_NAME'])
// %t - hostname without the first part
// %d - domain (http hostname $_SERVER['HTTP_HOST'] without the first part)
// %s - domain name after the '@' from e-mail address provided at login screen
// For example %n = mail.domain.tld, %t = domain.tld
// WARNING: After hostname change update of mail_host column in users table is
// required to match old user data records with the new host.
$config['default_host'] = 'localhost';
// provide an URL where a user can get support for this Roundcube installation
// PLEASE DO NOT LINK TO THE ROUNDCUBE.NET WEBSITE HERE!
$config['enable_installer'] = true;
$config['support_url'] = '';
// this key is used to encrypt the users imap password which is stored
// in the session record (and the client cookie if remember password is enabled).
// please provide a string of exactly 24 chars.
$config['des_key'] = 'FHgaM7ihtMkM1cBwckOcxPdT';
// ----------------------------------
// PLUGINS
// ----------------------------------
// List of active plugins (in plugins/ directory)
$config['plugins'] = array();
// Set the spell checking engine. Possible values:
// - 'googie' - the default
// - 'pspell' - requires the PHP Pspell module and aspell installed
// - 'enchant' - requires the PHP Enchant module
// - 'atd' - install your own After the Deadline server or check with the people at //www.afterthedeadline.com before using their API
// Since Google shut down their public spell checking service, you need to
// connect to a Nox Spell Server when using 'googie' here. Therefore specify the 'spellcheck_uri'
$config['spellcheck_engine'] = 'pspell';
그런 다음 라웈드큐브 웹 설치 프로그램에서 "계속"버튼을 누룬후 설정에 맞추어 작업을 끝낸다. 모든 설치가 끝나면 config.inc.php 파일에서 //$config['enable_installer'] = true; 같이 주석 처리 해준다.
[code]
# nano /etc/httpd/conf.d/roundcubemail.conf
[/code]
#
# Round Cube Webmail is a browser-based multilingual IMAP client
#
Alias /roundcubemail /usr/share/roundcubemail
Alias /webmail /usr/share/roundcubemail
# Define who can access the Webmail
# You can enlarge permissions once configured
#<Directory /usr/share/roundcubemail/>
# <IfModule mod_authz_core.c>
# # Apache 2.4
# Require local
# </IfModule>
# <IfModule !mod_authz_core.c>
# # Apache 2.2
# Order Deny,Allow
# Deny from all
# Allow from 127.0.0.1
# Allow from ::1
# </IfModule>
#</Directory>
<Directory /usr/share/roundcubemail/>
Options none
AllowOverride Limit
Require all granted
</Directory>
# Define who can access the installer
# keep this secured once configured
<Directory /usr/share/roundcubemail/installer/>
<IfModule mod_authz_core.c>
# Apache 2.4
Require local
</IfModule>
<IfModule !mod_authz_core.c>
# Apache 2.2
Order Deny,Allow
Deny from all
Allow from 127.0.0.1
Allow from ::1
</IfModule>
</Directory>
# Those directories should not be viewed by Web clients.
<Directory /usr/share/roundcubemail/bin/>
Order Allow,Deny
Deny from all
</Directory>
<Directory /usr/share/roundcubemail/plugins/enigma/home/>
Order Allow,Deny
Deny from all
</Directory>
[code]
# systemctl restart httpd.service
[/code]
Nginx 설치때와 또다르게 복잡합니다. 삽질이 어느정도 되었으니 ISPConfig 3을 설치 해 볼까요.....ㅎㅎ
[code]
# cd /tmp
# wget -O ispconfig.tar.gz https://git.ispconfig.org/ispconfig/ispconfig3/repository/archive.tar.gz?ref=stable-3.1
# tar xfz ispconfig.tar.gz
# cd ispconfig3*/install/
# php -q install.php
[/code]
--------------------------------------------------------------------------------
_____ ___________ _____ __ _ ____
|_ _/ ___| ___ \ / __ \ / _(_) /__ \
| | \ `--.| |_/ / | / \/ ___ _ __ | |_ _ __ _ _/ /
| | `--. \ __/ | | / _ \| '_ \| _| |/ _` | |_ |
_| |_/\__/ / | | \__/\ (_) | | | | | | | (_| | ___\ \
\___/\____/\_| \____/\___/|_| |_|_| |_|\__, | \____/
__/ |
|___/
--------------------------------------------------------------------------------
>> Initial configuration
Operating System: CentOS 7.3
Following will be a few questions for primary configuration so be careful.
Default values are in [brackets] and can be accepted with <ENTER>.
Tap in "quit" (without the quotes) to stop the installer.
Select language (en,de) [en]: <-- Hit Enter
Installation mode (standard,expert) [standard]: <-- Hit Enter
Full qualified hostname (FQDN) of the server, eg server1.domain.tld [server1.canomi.com]: <-- Hit Enter
MySQL server hostname [localhost]: <-- Hit Enter
MySQL server port [3306]: <-- Hit Enter
MySQL root username [root]: <-- Hit Enter
MySQL root password []: <-- Enter your MySQL root password
MySQL database to create [dbispconfig]: <-- Hit Enter
MySQL charset [utf8]: <-- Hit Enter
Configuring Postgrey
Configuring Postfix
Generating a 4096 bit RSA private key
.......................................................................++
........................................................................................................................................++
writing new private key to 'smtpd.key'
-----
You are about to be asked to enter information that will be incorporated
into your certificate request.
What you are about to enter is what is called a Distinguished Name or a DN.
There are quite a few fields but you can leave some blank
For some fields there will be a default value,
If you enter '.', the field will be left blank.
-----
Country Name (2 letter code) [AU]: <-- Enter 2 letter country code
State or Province Name (full name) [Some-State]: <-- Enter the name of the state
Locality Name (eg, city) []: <-- Enter your city
Organization Name (eg, company) [Internet Widgits Pty Ltd]: <-- Enter company name or press enter
Organizational Unit Name (eg, section) []: <-- Hit Enter
Common Name (e.g. server FQDN or YOUR name) []: <-- Enter the server hostname, in my case: server1.example.com
Email Address []: <-- Hit Enter
Configuring Mailman
Configuring Dovecot
Configuring Spamassassin
Configuring Amavisd
Configuring Getmail
Configuring BIND
Configuring Jailkit
Configuring Pureftpd
Configuring Apache
Configuring vlogger
Configuring Bastille Firewall
Configuring Fail2ban
[INFO] service OpenVZ not detected
Configuring Apps vhost
Installing ISPConfig
ISPConfig Port [8080]: <-- Hit Enter
Admin password [admin]: <-- Hit Enter
Do you want a secure (SSL) connection to the ISPConfig web interface (y,n) [y]: <-- Hit Enter
Generating RSA private key, 4096 bit long modulus
.......................++
................................................................................................................................++
e is 65537 (0x10001)
You are about to be asked to enter information that will be incorporated
into your certificate request.
What you are about to enter is what is called a Distinguished Name or a DN.
There are quite a few fields but you can leave some blank
For some fields there will be a default value,
If you enter '.', the field will be left blank.
-----
Country Name (2 letter code) [AU]: <-- Enter 2 letter country code
State or Province Name (full name) [Some-State]: <-- Enter the name of the state
Locality Name (eg, city) []: <-- Enter your city
Organization Name (eg, company) [Internet Widgits Pty Ltd]: <-- Enter company name or press enter
Organizational Unit Name (eg, section) []: <-- Hit Enter
Common Name (e.g. server FQDN or YOUR name) []: <-- Enter the server hostname, in my case: server1.example.com
Email Address []: <-- Hit Enter
Please enter the following 'extra' attributes
to be sent with your certificate request
A challenge password []: <-- Hit Enter
An optional company name []: <-- Hit Enter
writing RSA key
Configuring DBServer
Installing ISPConfig crontab
no crontab for root
no crontab for getmail
Detect IP addresses
Restarting services ...
Installation completed.
이렇게 끝맺음이 나면 정상적으로 설치가 된것이며,
이제 자신의 ip:8080 또는 server1.mydomain.com:8080 접속하면 로그인 화면이 나타난다.
최초 로그인 아이디와 패스워드는 admin과 admin 이니 로그인 후 필히 패스워드를 수정하시기 바랍니다.
한글 패치는 https://sir.kr/g5_tip/5236 여기서 받으세요.
'Linux' 카테고리의 다른 글
| CentOS7 Minimal 설치 후 설치해야 하는 것 처음, 초기설치 (1) | 2023.05.08 |
|---|---|
| 리눅스 shell sed 명령어 (0) | 2023.01.26 |
| APM + Tomcat 연동하기 (1) | 2022.10.04 |
| yum 사용법 (0) | 2022.05.30 |
| CentOS 7 AMP yum 설치 (0) | 2022.02.11 |


댓글